Sunday, November 10, 2019

How to setup Oracle Data Guard in AWS


This article helps you set up Oracle Data Guard 12c R1 (12.1.0.2) in Amazon Web Services (AWS) with 2 node configuration (primary and standby) along with Oracle Automatic Storage Management (ASM). This article assumes that you have basic knowledge how to work with the Amazon cloud https://aws.amazon.com 

1) Setup an account in https://aws.amazon.com (if you don't have one already.)

2) This 2 node Oracle Data Guard configuration can cost about $50 per month (depending on the amount of ASM disk storage you need) if you keep both the servers up and running 24*7.

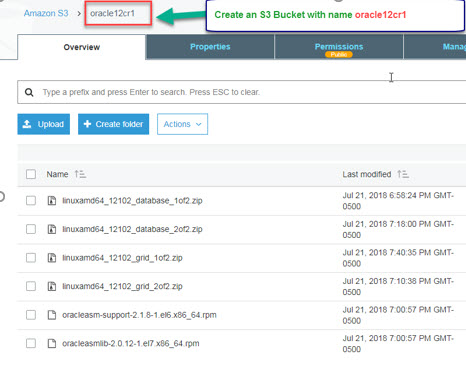
3) Download the Oracle 12c R1 software from https://edelivery.oracle.com for free. Also, download the Oracle 12c R1 ASM Grid Infrastructure software and then upload them to the Amazon S3 bucket as shown below. Let the S3 bucket be named oracle12cr1.

Also download the Oracle ASM RPMs (two of them) as shown below from the oracle website and upload to the same S3 bucket.


Now, launch the AWS Quick Start wizard using the cloud formation template (details in the above link).  Also, you need to specify the right  parameter values to setup the 2 node Oracle Data Guard configuration.

One of the below parameters (InstallBucketName) needs to specify the above Amazon S3 bucket name that has all the Oracle software available already.

Please use the parameters in the below screenshots that will help you in a successful launch of the 2 node Oracle Data Guard configuration in AWS.


Saturday, November 2, 2019

Oracle 19c database upgrade

Oracle Corporation released database version 19c in 2019. 19c is considered a long term release from Oracle Corporation and its extended support date is till March 2026.

Oracle Corporation does not recommend you to upgrade to 18c if you are already on one of the Oracle 12c database releases. So, if you are on either Oracle 12c R1 or Oracle 12c R2, then the recommended upgrade is to upgrade to Oracle 19c directly.

Also, another point to note is that 19c is practically considered a patch set on top of the existing Oracle 12c database versions. Oracle 19c is essentially 12.2.0.3 (12c R2 patchset 2). DBA University's Oracle DBA Training is based on 12c R2. So, essentially we cover both 18c and 19c topics in our training

Oracle Corporation is now naming their database release numbers based on the calendar year similar to Microsoft SQL Server.

To give a background, Oracle 12c R1 was released in 2013, Oracle 12c R2 base release 12.2.0.1 in 2017, Oracle 18c which 12.2.0.2 in 2018 and Oracle 19c which is 12.2.0.3 in 2019.

Sunday, June 30, 2019

oraenv unary operator expected

If you are getting the error unary operator expected while setting the environment of an Oracle instance using the oraenv command, then one reason could be that the path of the ORACLE HOME inside the /etc/oratab file must have been a symbolic link. oraenv works with only real paths, not symbolic links. You can still have symbolic links to ORACLE HOME, but the /etc/oratab must only have the real path.

Saturday, August 18, 2018

How to remove Data Guard Broker configuration in Oracle 12c R1

Introduction

Though all of the Data Guard management and administration operations can be performed using SQL*Plus, it is recommended to use the separate Data Guard Broker interface (dgmgrl). There may be special circumstances in your organization to just use SQL*Plus alone and not use the dgmgrl utility anymore. 

This blog post provides the list of steps to be performed to disable and remove the Broker configuration and only have SQL*Plus to administer the Data Guard configuration.

Solution

The dgmgrl utility can be invoked from any database host in the Data Guard configuration to disable and remove the Broker configuration. This post assumes a 2 node configuration with one primary database host and another standby database host.


1) Set the standby instance environment.
2) dgmgrl
3) connect /
4) show configuration;
5) disable configuration;
6) remove configuration;
7) Now set the +ASM instance environment on both standby and primary database host (assuming the Oracle databases are using ASM) and perform the below steps.

a) cd $ORACLE_HOME/network/admin
b) Make a backup of the existing Oracle Grid Infrastructure's listener.ora
c) Now edit listener.ora and remove the entry having DGMGRL.
d) Restart the listener service.

8) Now set the Oracle database instance environment and execute the below command on both the hosts.

a) sqlplus / as sysdba
b) alter system set dg_broker_start = FALSE scope=both;

9) On the primary database, the log_archive_dest_state_2 parameter value that describes the log shipping status to the standby host may have a value of RESET (Assuming this is the parameter used for log shipping status description to standby among several other log_archive_dest_state_n parameters).  Make it enable again by executing the command alter system set log_archive_dest_state_2 = enable scope=both;

10) Now login to the standby database server and set the standby database instance and execute the below commands.

a) sqlplus / as sysdba
b) shutdown immediate;
c) startup mount;
d) ALTER DATABASE RECOVER MANAGED STANDBY DATABASE DISCONNECT FROM SESSION;

e) exit
f) ps -ef | grep -i "mrp"   (Must show the mrp managed recovery process on the standby server.)

11) 

select  process,CLIENT_PROCESS,SEQUENCE#,status
from    v$managed_standby
where process like '%MRP0%' or client_process like '%LGWR%';

The sequence# must be within +/-2 compared to the value obtained from Current log sequence value of the primary database and that helps us validate the the log shipping service on primary and log apply service on standby are working successfully.

Thursday, May 31, 2018

aws is not recognized as an internal or external command

If you get the 'aws' is not recognized as an internal or external command error message in Windows Command Prompt (cmd) even after installing the AWS Command Line Interface (CLI) 64-bit using the Windows Installer, then please Log off and Login to your Windows computer again. This simple trick will help solve the problem.

After login to your Windows computer again, open cmd (Windows Command Prompt) and this time, type the aws --version command should return the output successfully without any error.


Oracle DBA Training and MS SQL Server DBA Training course fee reduced

We have reduced our Oracle DBA Training and MS SQL Server DBA Training course fees by 30%. Now, each of these courses is only $349.

Click here to know how DBA University is different from other training providers such as Udemy, Simplilearn, Intellipaat etc.


Saturday, August 5, 2017

How to login to SQL Server if all logins with sysadmin role are disabled


Introduction

SQL Server 2016 creates a built-in login called "sa" with sysadmin server role. Additionally, several other built-in logins such as NT Service\MSSQLSERVER and NT Service\SQLSERVERAGENT are also created with the sysadmin fixed server role during the instance creation process (SQL Server installation).

Because it is not recommended to perform database administration with the "sa" login, you may have already created an additional login (new login) with the sysadmin role and and named it as sqlserver.

This article explains how to login to SQL Server if you have accidentally disabled the "sa" login and any other new logins created with the sysadmin role (aka "locked yourself") scenario.

Assumptions

The instance id is the default instance id MSSQLSERVER.

Solution

1)  Stop SQL Server (MSSQLSERVER) database engine Windows service.

2) Create a new Windows operating system (OS) user, for example, sqlserver_new and make it part of the Administrators OS group.

3) Login to the database server using Remote Desktop Connection as this new OS user sqlserver_new and then launch SQL Server 2016  Configuration Manager => SQL Server Services => SQL Server (MSSQLSERVER) => right click => Properties

Then add the -m startup parameter, which helps us restart SQL Server in single user mode. Please see below screenshot.


4) Click on Apply and close the window. Now right click => Restart

This will restart the SQL Server (MSSQLSERVER) database engine in Single user mode.

5) Make sure SQL Server Agent service is stopped. If it is started, then it will consume the single user by itself. We don't want that.

6) Now launch SQL Server Management studio (SSMS) as administrator. ( Right click => Run as administrator) .  You can login with the new sqlserver_new OS user even though this account is not created as an instance login inside the database instance.

Then once inside SSMS => Security => Logins and then enable,grant access to those existing sysadmin role accounts which were accidentally disabled (or) simply create a new login with a sysadmin role.

7) Now launch SQL Server 2016  Configuration Manager  again, this time remove the -m startup parameter and restart the SQL Server (MSSQLSERVER) service. This will help us get back to the multi-user mode again.

8) You can remove the OS user sqlserver_new if you no longer require it. This account was created specifically to fix the problem, so you may not need it.

9) And finally, start the SQL Server Agent service again.